• Thank you for visiting HeavyEquipmentForums.com! Our objective is to provide industry professionals a place to gather to exchange questions, answers and ideas. We welcome you to register using the "Register" icon at the top of the page. We'd appreciate any help you can offer in spreading the word of our new site. The more members that join, the bigger resource for all to enjoy. Thank you!

Needing advice for cutting in new access track up a slope

Guy: CAT-308E2

Active Member
Joined
Dec 12, 2022
Messages
25
Location
Australia
@Lagwagon
how I see that picture, every bit you move the end point to the right it involves a bigger grade change. Let's see if Guy comes back and confirms, but it looks like the bottom of the slope, slopes to the right too. I get that from the pond placement.
That might be why he chooses that end?

EDIT: Guy if I were free to travel I'd come give you a hand. That looks like beautiful country.


bottom of slope from digger to the right is pretty uniform, but yes since it slopes up sharply towards the top, the greater length the betterer haha.

Thanks mate! we definitely feel damn grateful to be here...
 

Guy: CAT-308E2

Active Member
Joined
Dec 12, 2022
Messages
25
Location
Australia
With an excavator it doesn't really matter if you make a road going up or down. Start at the end with the easiest access so you can get to the machine with a Ute incase of breakdown or refuelling if you are going to leave it on site and if the weather turns to shyt you can get it off site .
Good to know :) makes sense too!
 

Guy: CAT-308E2

Active Member
Joined
Dec 12, 2022
Messages
25
Location
Australia
Hey there legends... been a while!

I've been busy in the digger in the past year and a bit more - Think I'm finally ready to attack that hillside I mentioned alllll those months ago - here's three photos of my rough plan with colours to help differentiate:

Aqua: rough direction of two tracks (see previous pics for whole Hill!)

Dark blue: drainage ditch

Red: potential concrete pipe from drainage trench into larger causeway (may use sandstone rocks instead in an open causeway as that's what I'll line the drainage trench with up the hill).

I'll cut the top track so it drains back in to the uphill side and the bottom track I'll just camber it slightly towards downhill as the cross fall is not much and most of the groundwater (I think) will be caught by the top track. If I put the same type of drainage trench in for the bottom track I then have to deal with where it would meet back at that bridge. Not impossible but more work I may not HAVE to do.

Any thoughts, advice, questions, or 'rules-of-thumb' to stick by?

Hope you're all well and getting stuck in to whichever project you're on to!

Cheers ✌️1000018864.jpg1000018862.jpg1000018863.jpg
 

Tones

Senior Member
Joined
Mar 15, 2009
Messages
3,160
Location
Ubique
Occupation
Ex land clearing contractor, part-time retired
First rule of thumb- don't cut the cross fall to the outside of the track, go the other way so it drains into the table drain. You're are in a high rainfall area so some Whoa Buoys is a good idea so check out the Forestry NSW web site for these. They have a great idea of making them out of old conveyer belt so there's no humps. First time I saw them was on the Far South Coast NSW , reckoned they were the ducks guts.

I understand that photos make terrain look flat but that looks almost as flat as a schit carters hat.
 
Last edited:

Guy: CAT-308E2

Active Member
Joined
Dec 12, 2022
Messages
25
Location
Australia
First rule of thumb- don't cut the cross fall to the outside of the track, go the other way so it drains into the table drain. You're are in a high rainfall area so some Whoa Buoys is a good idea so check out the Forestry NSW web site for these. They have a great idea of making them out of old conveyer belt so there's no humps. First time I saw them was on the Far South Coast NSW , reckoned they were the ducks guts.

I understand that photos make terrain look flat but that looks almost as flat as a schit carters hat.
yea those slopes have BIIIG pucker factor... especially in the wet... actually thats what its taken me so long to start. this valley is Sth facing so its lush topoil is rarely not moist!

Then again, if I can get my gradient right, the clay found in the hill under the soil is perrrrfect for taking 30-40mm blue metal when the clay is a bit moist. but I want to get my drainage plan down andf execute it well so it's a do-it-well-do-it-once job.

Thinking rough sandstone bush rock for the drainage trench/s (dark blue).

I won't use woah-boys as we want to keep the track aesthetically nice (even though can't fault the functionality of them!).

If the road/s are cut to a % so they fall back in to the hillside, shouldn't be much to worry about with the trech taking all groundwater that comes down, especially with sandstone bushrocks lining it, lomandra and vegetation planted out along it, and blue metal of an appropriate size (30-40mm?) sealed down in the moist clay surface.

Have found that to be the case so far on other tracks here anyway... But Always room to learn more!

...Any tips on how to marry the drain trenches in to that main causeway? especially where peak rainfall events are concerned, and that lower access track I'd have to get fiddley with pipes under the road hey..?

Cheers!
 

Tones

Senior Member
Joined
Mar 15, 2009
Messages
3,160
Location
Ubique
Occupation
Ex land clearing contractor, part-time retired
I sent a link to Scrub Puller years ago on how to build them without having any humps so it could be still there. Basically you dig a narrow trench across the road about 300mm deep, then with a length of rubber mat and 500mm wide place in the trench on edge, 100mm protruding and the other side of 100mm lying in the bottom of the trench. the vertical bit should be against the uphill wall then back fill and compact the trench.
The beauty of this, as traffic passes over the rubber lays down and stands up afterwards and used conveyor belt is almost a give away at your local quarry.
I've looked on the Forestry NSW but couldn't find the build diagrams but seem to have been deleted
 

Guy: CAT-308E2

Active Member
Joined
Dec 12, 2022
Messages
25
Location
Australia
@Lagwagon
how I see that picture, every bit you move the end point to the right it involves a bigger grade change. Let's see if Guy comes back and confirms, but it looks like the bottom of the slope, slopes to the right too. I get that from the pond placement.
That might be why he chooses that end?

EDIT: Guy if I were free to travel I'd come give you a hand. That looks like beautiful country.
Where abouts are you mate? We're just 1hr nth of Syd.

In the 2 years its been since I started this thread (2 years!) I have got a lot more experience working on the property (had a LOT of other jobs take priority...) which is nice to now know. But that said I still want to go carefully up this job - especialaly building it appropriately for longevity in the face of peak rainfall events...!

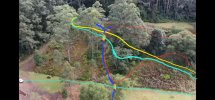
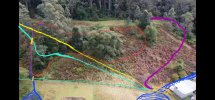
I have some updated drone vision Ive linked here:

And while i'm at it ill re-upload a few screenshots of it overlayed with some drawings showing what updated route info i've been piecing together in my head...


Colour legend:

Dark Blue - Natural Water flow (Main causeway/dam overflow that runs behind cottage is only 'proposed' at this stage... No idea if it's viable yet... Thoughts?)

Aqua - T1 & L1 ( "Top Route" 1 & "Lower Route" 1 are most likely what I'm currently planning to cut...)

Yellow - T2 'Alternate Top route' (Is this straight even possible over the 133m in length? Height to traverse is 20m, with that steep hump in the middle to add to complexity)

Red - Defines in and/or along it's borders steep area/s of hillside (40-50 degrees)

Orange - Current Bridge, and two proposed pipes

Purple - T3 'Alternate Top Route' (Would require sculpting out a hair-pin turn right after the bridge, This possible route would have to end turning around and following up the ridge that meets the gully behind the cottage.


On all 3 possible "Top Routes" I imagine I'll have to incorporate some sort of 'sump' that takes the water flow volume and each of their respective velocities off it's drainage trench via pipes and then have to empty (with enough smart design that's appropriate) into the main causeway...

It's these drainage elements that I obviusly need to pay very sharp attention to design wise... The other pipes that would cross T1 and L1 routes further along their hillside I imagine are relatively easy to put in. I've done a few of those already using bushrock for headwalls and outflows. Looks great too!


cheers again to you all @Lagwagon @R.D.G013 @ianjoub @Tones @Welder Dave @Stephen Doyle and anyone else for sharing your experince and feedback!

Hope this thread can help other newbies too.

Guy
 

Attachments

  • Hillside Tracks 1.jpg
    Hillside Tracks 1.jpg
    144.4 KB · Views: 2
  • Hillside Tracks 2.jpg
    Hillside Tracks 2.jpg
    151.4 KB · Views: 2
  • Hillside Tracks 3.jpg
    Hillside Tracks 3.jpg
    147.8 KB · Views: 2

Queenslander

Senior Member
Joined
Apr 5, 2009
Messages
1,266
Location
Australia
If the road/s are cut to a % so they fall back in to the hillside, shouldn't be much to worry about with the trech taking all groundwater that comes down

Another option might be to cut the road falling to the outside, say 3 or 4%.
This way the road is shedding water evenly right from the start, rather than collecting more and more as it moves down the hillside, especially if you aren't using whoa boys.
 

MG84

Senior Member
Joined
Jan 6, 2023
Messages
696
Location
Virginia
Out slope vs In slope

If it's a low use road and likely to not be well maintained I generally out slope. However, you must also consider how good your fill is on the down hill side (to take the run off) and/or the ability to get it seeded quickly. Out sloped is not as good if you have a lot of surface water coming down the hill from above. Also it can be more treacherous to travel in slick conditions like mud or snow. Only culverts needed would be where water is actively trying to cross the road.

In sloped roads will require a good ditch along the uphill side, a flat bottom ditch ~2-3' wide is best, but often not practical in steep country, a V ditch will work but is more likely to erode. With an in sloped road you'll need culverts crossing the road every 100-200' to take the water away, as well as at any seep/spring/stream. They should ideally extend all the way through the fill and discharge on virgin ground below the road. Ditches and culverts will require continued maintenance but make for a better road.

Third, possibly the best option, is a crowned road. It'll shed the water fastest and keep the road surface in better shape. It will need the considerations of both and in slope and out slope road, (good fill/seeding, ditches, culverts). In any situation you should put in broad base dips where possible, they are a good way to divert any water following the road surface away. At the very least install a broad base dip at the top of the hill to catch any water before it starts down the road.
 
Last edited:

Guy: CAT-308E2

Active Member
Joined
Dec 12, 2022
Messages
25
Location
Australia
Out slope vs In slope

If it's a low use road and likely to not be well maintained I generally out slope. However, you must also consider how good your fill is on the down hill side (to take the run off) and/or the ability to get it seeded quickly. Out sloped is not as good if you have a lot of surface water coming down the hill from above. Also it can be more treacherous to travel in slick conditions like mud or snow. Only culverts needed would be where water is actively trying to cross the road.

In sloped roads will require a good ditch along the uphill side, a flat bottom ditch ~2-3' wide is best, but often not practical in steep country, a V ditch will work but is more likely to erode. With an in sloped road you'll need culverts crossing the road every 100-200' to take the water away, as well as at any seep/spring/stream. They should ideally extend all the way through the fill and discharge on virgin ground below the road. Ditches and culverts will require continued maintenance but make for a better road.

Third, possibly the best option, is a crowned road. It'll shed the water fastest and keep the road surface in better shape. It will need the considerations of both and in slope and out slope road, (good fill/seeding, ditches, culverts). In any situation you should put in broad base dips where possible, they are a good way to divert any water following the road surface away. At the very least install a broad base dip at the top of the hill to catch any water before it starts down the road.
Appreciate this level of detail in you reply - cheers!
 

Tones

Senior Member
Joined
Mar 15, 2009
Messages
3,160
Location
Ubique
Occupation
Ex land clearing contractor, part-time retired
The thread is two years old. I plan to be there in two more years. Just hold on a minute.
Pity you can't do the trip next year. Easter is the last Wheels at Wanaka show In NZ with all the old cars,trucks, farm equipment including traction engines and earthmoving gear. You'd like it and it's only a 2hr flight to jump the ditch to Oz.
 
Top