workshoprat92
Senior Member
Man that was awsome thinking on the screws and washers. Thats was an excellent way to do it.
Man that was awsome thinking on the screws and washers. Thats was an excellent way to do it.
Nitelite, I finally got a chance to catch up on your thread! That is very impressive progress!!! I've just sourced a new-to-me block for my kitty, so I hope to be following in your footsteps of the engine work soon!
I called Off Road today and heard the sad news that Jeff is not working sales anymore. That's a bummer... :thumbdown:thumbdown


Jeff is a buyer for Offroad now. Ask for Jeff Robinson and if you can get through to him he will still fill your order.
I ended up emailing him from his address off an old order and he is helping me out. Someone else tried quoting me what I need though Offroad and I had Jeff re-do it. What was quoted to me at $913.60, Jeff re-quoted with some different parts groups for $651.75. It sure helps to find the right people!!!!
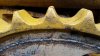
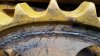
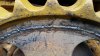
Glad to see those sprockets welded up!
What rods did you use for the weld? My half-@ssed welder eye is not telling me anything.
Tomorrow it will get some hard facing on the bottom of the bucket.
those words just make my skin crawl LOL. I think I even threw up in my mouth a little. If I had a dollar for every warped fd up bucket I have seen from hard surfacing I could probably retire. Wear plates is a far better way to go.
Tomorrow it will get some hard facing on the bottom of the bucket.
those words just make my skin crawl LOL. I think I even threw up in my mouth a little. If I had a dollar for every warped fd up bucket I have seen from hard surfacing I could probably retire. Wear plates is a far better way to go.
From judging the quality of work that I have posted in this thread do you really think that I would screw up my bucket? Think again, if you almost got sick it was probably caused by something that you ate!