• Thank you for visiting HeavyEquipmentForums.com! Our objective is to provide industry professionals a place to gather to exchange questions, answers and ideas. We welcome you to register using the "Register" icon at the top of the page. We'd appreciate any help you can offer in spreading the word of our new site. The more members that join, the bigger resource for all to enjoy. Thank you!

Remember that pan I lost? It's nuthin compared to this!

Homer Dokes

Well-Known Member
Joined
Nov 3, 2013
Messages
207
Location
Midwest
Occupation
Jack of all trades... pretty damn good at some.
Hello all,

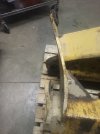
Here I was all proud of myself having overcome the issues of the lost pan on my IH-412 scraper. Several days later and now I have a BIG problem. As near as I can reconstruct we lost a rear pin on the control arm for the pan which then when emptying the bowl caused a bind that couldn't be overcome but for ripping the back end of the mechanisms out by that big ass cylinder that initiates it all.

I have a plan to overcome however please take a look at offer up any suggestions that may come to mind. The scraper is dead in the water at the moment and I must get it back up and operable again. My biggest question is what kind of force (tonnage) will it take to bend the eyelet back in place on the end of the cylinder in the pic? Everything else I can deal with in my shop.
 

Attachments

  • IMG_20251027_165113_957.jpg
    IMG_20251027_165113_957.jpg
    6.8 MB · Views: 109

Tones

Senior Member
Joined
Mar 15, 2009
Messages
4,261
Location
Ubique
Occupation
Ex land clearing contractor, part-time retired
Gezz, you must be happy with having bad luck, without it you'd have no dam luck whatsoever.
 

Homer Dokes

Well-Known Member
Joined
Nov 3, 2013
Messages
207
Location
Midwest
Occupation
Jack of all trades... pretty damn good at some.
Don't I know it. Remember that 'ol HeeHaw bit with the ol timers and their moonshine jugs... "Blues, dispair, and agony on me!"

I'm afraid this one could have been avoided which is the part that really irks me.
 

treemuncher

Senior Member
Joined
Dec 31, 2006
Messages
1,179
Location
West TN
Occupation
eatin' trees, poopin' chips
Watch some of the videos from CEE on YouTube for some inspiration and ideas. I've watched him do some incredible repairs on trashed parts. Of course, he makes it look easy on video and he has the proper tooling to get it done right the first time. I have learned a lot and gotten some inspiration from these videos - definitely worth my time to watch and learn from them. I really like his big press and tooling that goes with it. So much easier than my 20t p.o.s. press that flexes.

I see the need for a big rosebud torch, heavy chains and a porta-power after analyzing the forces and directions required to put it back to near straight. Looks like a challenge to me. Or, cut off the trashed eye and weld on a new one. Try to get the rest as straight as possible or new attachment points when beyond anything close to straight.

I feel your pain. I lost my two front guides on the sliding floor of my 862B on Sunday and knocked it out of commision just before the rains set in. Cast steel plates are over $1k each! I will be welding those up or making new parts on the mill if required. No way that I will pay that much for those plates for something that I don't use as a regular source of income.
 

Homer Dokes

Well-Known Member
Joined
Nov 3, 2013
Messages
207
Location
Midwest
Occupation
Jack of all trades... pretty damn good at some.
Just checked out the CEE channel. I was never aware of it before. That's a great channel. It's right down my ally with my prototyping shop. Thanks for passing that on treemuncher.
 

Homer Dokes

Well-Known Member
Joined
Nov 3, 2013
Messages
207
Location
Midwest
Occupation
Jack of all trades... pretty damn good at some.
I’d make up a new eye and weld it on the cylinder, depending on how hard that cylinder would come out.
I have a couple of 50 ton presses but not sure that would be enough. Even with heat. Have considered if someone with a 100 or 150 ton press might be advantageous. Have had opportunities in the past to purchase a 200 ton press.... kinda wished I had now.
 

Homer Dokes

Well-Known Member
Joined
Nov 3, 2013
Messages
207
Location
Midwest
Occupation
Jack of all trades... pretty damn good at some.
So it has been quite the day...

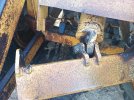
We have removed the damaged pieces from the IH-412 and have them back at the shop. It looks a bit more daunting here on the pallet than it did sitting in the scraper. I'd like to think that heat and leverage will be the order of the day here but I'm not certain I have what it takes for both. Pondering this one a bit. Can anyone offer some guidance on tonnage vs steel? In other words... what method is best to calculate what tonnage will it take to bend different thicknesses of steel.

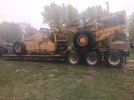
In the mean time... I had made an offer on an IH E200 scraper yesterday and the party selling it accepted my offer at noon today. I had hoped that they would yesterday late afternoon and I had a hauler at the ready to move it this morning.... which I cancelled early this morning. Called them at noon:30 and damn if they were able to go get it and bring it to the job site this afternoon. We had it there at 3:30pm. I found this unit 3 days ago and wanted to purchase it to have two scrapers working in tandem. At the moment... this addition is saving the day just being able to continue to move clay.
 

Attachments

  • IMG_20251028_163330_392.jpg
    IMG_20251028_163330_392.jpg
    3 MB · Views: 66
  • photo_2025-10-28_18-30-00.jpg
    photo_2025-10-28_18-30-00.jpg
    176.9 KB · Views: 65
  • photo_2025-10-28_18-31-03.jpg
    photo_2025-10-28_18-31-03.jpg
    373.9 KB · Views: 66

treemuncher

Senior Member
Joined
Dec 31, 2006
Messages
1,179
Location
West TN
Occupation
eatin' trees, poopin' chips
Looking at that combination of bends makes me wonder if it would be easier to gouge out some of the welds to get to individual, manageable parts. Then straighten or fab up new of the worst bent pieces and then weld back together when everything is straight enough to be able to be used. Then again, maybe it looks worse than it is. Sure looks like a lot of heat required to get that back to straight!
 

Homer Dokes

Well-Known Member
Joined
Nov 3, 2013
Messages
207
Location
Midwest
Occupation
Jack of all trades... pretty damn good at some.
it seems to me that this isn't the first time something has gone sqew if here.
Agreed. Someone had added some reinforcement to one side only which seems odd. I know what caused this issue for us.... it was human error. My operator screwed up. Had nothing to do with a failure of the machine.
 

HarleyHappy

Senior Member
Joined
Sep 30, 2020
Messages
3,486
Location
So NH
Occupation
Welder/Mechanic
I second the motion, on cutting new pieces and welding then on. Might install a second gusset on the other side to match. I would save the side tab on the outside of the beam and just heat that up and bend that one back.
Few hours cutting out new plates and couple hours milling new holes.
Few hours welding it up.
 

Welder Dave

Senior Member
Joined
Oct 11, 2014
Messages
18,204
Location
Canada
A 50 ton press should work with a rosebud on the cylinder ear but straightening might elongate the hole. I'd guess there's a hardened bushing as well. You could weld the bore and line bore or machine a new hole. Fixturing in the press will take some thinking. I have a bent ear on a stabilizer cylinder for a backhoe. It's not real critical but at some point I think I'm going to try straightening it. I think I'll just leave it installed and heat each side and pull on the cylinder with a come-a-long. I'm worried the hole will be elongated too but I think the cylinder could be set up in larger milling machine if the hole needs to be welded and redone.

The other bent pieces I'd figure out a way to hold them really solidly so you could apply force to straighten them. I'd make a long bar with at least a 3/4" thick U shape that just fits over the metal thickness. Basically like using a crescent wrench to straighten or bend a plate but that fits deeper over the plate. With a friend heat where the bends are while the other pulls/pry's on the bar you made. Make the bar at least 4' long and so you could add an even longer pipe or tube over it. If you could make a pin to fit the hole and weld a long arm to it could also work. Put the pin in the hole and heat and twist as needed. Thread a hole for a bolt in the pin to hold a backing bar would prevent the pin sliding out when pulling to straighten. It could be scary if the pin slid out while someone was reefing on the bar the pin is welded too. I think it's possible to straighten it good enough to work but you'll need a big rose bud to keep the area red hot for bending. If the plates are really twisted close to where they're welded on they may need to be cut off and replaced. I'd try straightening first. You can't really make it worse it's already buggered. Extra gussets and/or reinforcing plates would be a good idea once you get everything straight.
 

treemuncher

Senior Member
Joined
Dec 31, 2006
Messages
1,179
Location
West TN
Occupation
eatin' trees, poopin' chips
I hope your repairs go as smooth as mine did. These were the front sliding floor hanger plates on my 862b. One side broke during a load and that tweaked the floor during the dump cycle. Instead of investigating the non-dumping issue, I tried cycling the floor a few times until the second side audibly popped. I knew better! I went out with the metal detector and found all of my missing parts.

I've never messed with cast steel but with a little research, I think I got it done right. Baked in the shop oven at 350 degrees for 1.5 hours prior to welding with 7018, using 150 and 350 tempil sticks to maintain proper temps during the welding process and machining out a holding plate to retain the proper shape during the welds. It was ground out heavily into a deep Vee on each side and the plate retained the original dimensions just fine. After welding, back in the oven with the plate installed for another hour at 350 and then wrapped in a heavy welding blanket for a slow cool down. All I have left is to machine down the interior flats on the Bridgeport this morning. I also have to manufacture new top slide inserts as I think that the amount of wear on the old ones, or a previously cracked hanger, may have started this failure.

Both sides failed right down the bolt hole line for the lower slide inserts. The piece on the left is already veed out with the hold down plate installed.

View attachment IMG_2160.JPG

I was given the "shop" oven by a good buddy many years ago when he upgraded for his wife. Nothing fancy but perfect for shop work when needed. Preheating the first hanger and the 7018 rods to be used on the top. The old rods on the bottom just stiffen the rack.
IMG_20251029_091927_085.jpg

Front side welded and back edges tacked down. You can see that the 150 tempil stick is still liquid but the 350 is not. The upper inserts were so worn on this side that the lands of the bolt holes are worn down - near bottom of photo - had eaten through nearly 1/2 of the bolt diameters. These lands were built up and will be machined back down to size.
IMG_20251029_094815_937.jpg

I kept the heated part on wood blocks so it did not cool rapidly on the welding table. Using the tempil sticks was key to keeping the temp withing the 150-350 range during the welding session. I did notice that while welding the cast steel that I had to run at a lower amperage than welding normal ASTM 36. I ran 1/8" rod at 92 amps and that was still a bit hot at times.
IMG_20251029_092157_753.jpg

I think I would prefer repairing a clean break like this rather than trying to repair a failure pretzel. This went fairly easy in comparison.
 
Top