Cannon
Member
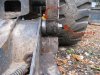
While I was supervising the 14 yo, I noticed the bucket was becoming loose so pulled out the breaker bar to tighten and wasn't able to put any additional torque on the bolt because it had sheared off. So time to shut down and perform surgery....
-Detached the bucket.
-Detached the hydraulic cylinder.
-Removed the Bolt, washer, cup & seal from each side.
-Separated the Bob-Tach assembly from the Lift arms.
Inspection.
-One pin had shattered due to the bushing had disintegrated (1804 hrs on the machine).
-The Bob-Tach mounting hole straight bushing that the pin sat in had to be chiseled out (no I don't have a cutting torch). No longer straight, but waller'd out.
-The Lift Arm had 'egged (not round - tapered), and that tapered bushing is WELDED in (no torch), so can't remove.
CHECK LIST/REPAIR STEPS (Please comment).
-Pickup/install straight bushing into waller'd out Bob-Tach mounting hole. Coat with JB Weld slow hardening compound & leave overnight.
-Install pins by 'whaling on (seating) with a big hammer.
-Oh, and the lift arm has egged enough to also have the bolt washer start to wear out the exterior side of the lift arm, so... I've ground a small amount of the tapered side of the pin so that it fits flush with the outer side of the lift arm, as well as snug with the welded-in lift arm bushing.
-Double up on large galvanized washers on the outer side of the lift arms (approx 1/8" thick).
-Reassemble and torque to 180+ lbs.
-Apologize to the wife (somewhere in here) for tracking in, dirtying up, taking too much, or spending too much.
Comments/experience welcome. Thanx in advance.